Sunday, March 15, 2015

A New Addition to the "Family" and a recipe!

Hi peeps! 


So…can you guess what I just got???


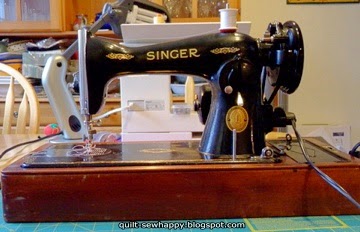
I found this vintage Singer on Craig's List, and my Uncle went to pick it up for me! She was a little bit dusty so I gave her a good clean. The wooden base has that slightly musty smell that wood gets when it is in storage for too long. That doesn't bother me so much, I can always stick a dryer sheet in there, to soak up the smell.


Here you can see most of her decals...they are in excellent condition, and are quite pretty.


Here's a close-up of the decals and her serial number. I had a look online and found a site which can help you date your machine and find out the model number. I think this is a 15-90 model, made in 1948…but I am not totally sure, so I also emailed Singer to see if they could help date her for me.


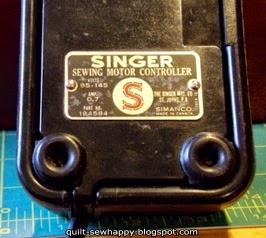
On the bottom of the foot pedal it says "Made in Canada", but that is probably only where the foot pedal was made.


The box with the accessories in it also said "Made in Canada"…so the mystery deepens! I'm hoping Singer will be able to give me some info on where she was made.

I managed to get her threaded and popped in the bobbin, but the stitches are not completing, so I'm not sure if it is the new needle I put in it, or possibly I threaded it incorrectly. All in all, still a good deal for only $45!!! I don't mind putting some $$ on her to make her run like a dream. 

So many people say how wonderfully these old cast-iron machines run. She sure is heavy though, the Hubs had to oomph a little to get her onto the kitchen table!!!


This recipe was in the Vancouver Sun this past Wednesday,though it is actually from the Portlandia Cookbook. We defrosted a small chicken overnight on Thursday and made the soup on Friday. We all ate a hearty bowl of this soup on Friday for supper and there was enough soup leftover to be an accompaniment to a sandwich on Saturday night for all 3 of us.

Tortilla Soup with Chicken

2 T. vegetable oil
1 medium onion, finely chopped
2 large Poblano peppers, stemmed, seeded and finely chopped*
2 large cloves of garlic, finely chopped
2 t. ground cumin
6 cups low-sodium chicken broth
kosher sale and black pepper
4 corn tortillas, cut into 1 inch strips
1/4 cup fresh cilantro leaves, plus more for garnish
4 cups cooked & shredded chicken(we used a small chicken and it was fine)
1 cup hominy, rinsed & drained**
Sour cream and broken tortilla chips for garnish
*we used a small can of mild green chilies as there were no Poblanos in the store
**There was no Hominy to be found so we subbed in a can of corn niblets

In a large pot, heat the oil and add the onions, chilies, garlic, cumin and salt and pepper to taste. Cover and cook over medium heat, stirring occasionally until softened-about 5 mins.

Add the broth and tortilla strips, cover and bring to a boil. Simmer over low heat until the vegetables and tortilla strips are very soft-about 5 mins.

Add the 1/4 cup of cilantro and using a stick blender, puree the soup until smooth.

Add the chicken and hominy and simmer uncovered for 5 mins.

Ladle the soup into shallow bowls and garnish with sour cream, cilantro and broken up tortilla chips.

Note-I would not omit the tortilla chips at the end as they add some needed salt taste to the soup.

This was a fast and easy soup to make and is now a favourite. I hope it will become yours too!

***********************

Question of the day:

Does anyone out there own a vintage seeing machine, and if so, which one?also, what shall I name my new-to-me vintage Singer?

Sharing is caring!!! 

Don't forget that I am happy to share…feel free to pin to Pinterest, post on Google+ and Facebook, and Tweet away! Just please make sure your posts link back to this blog. 

*If you mouse/hover over the top right corner of my photos, a red pin-it button will show up and all you have to do is click it to be taken to Pinterest. There is also another red button right beside it for posting to Facebook and Twitter. Or, you could always use the little grey square buttons at the end of this post.

Thanks for reading and have a great day! 

Quilty Huggs, 

Jacqueline 

PLEASE NOTE: The writer of this blog accepts forms of compensation such as, but not limited to; fabric/notions/patterns/books in exchange for a posted review. All comments/critiques/opinions are completely my own and are not those of the provider. 

This post may also contain affiliate links and I will receive a small commission if you make a purchase after clicking on my link. Thanks!

Friday, March 13, 2015

Follow-Up-Friday: What I've Been Up To!!!

Hi peeps! 


How's everyone doing today??? We are having crazy weather…sunny and up to 55 degrees one day, then cold and rainy the next!!! It's really doing a number on my migraines and the Fibromyalgia…grrr!

As promised in this post,I had some fun playing with my citrus HST's. I came up with the above placement and sewed them all together yesterday. I have to say that this is the first time ever, that my HST's have worked out! This time I was very careful to mark my sewing lines and I actually trimmed them too! What a difference that made!


I also promised to show you what I get up to in the evenings while binge-watching Netflix(we are on season 4 of House, MD and season 3 of House of Cards). Well, I sew English Paper Pieced hexagons(1" sides)…a whole lot of them!!! 

Pictured is a pile of about 75% of the hexies I have already done for the Kid's quilt.  These ones have already been sewn together in threes…which I call "triplets".


Once I get all my "triplets" done, I sew three of them together, side by side, into "niners". Sew, sew, sew!!!


I store my "niners" in a plastic shoebox. I have them wedged in there very tight, so they actually press themselves. This also keep them nice and flat as when I sew them together they kind of curl up at the ends.


Once the "niners" are all sewn together, I stack two of them to make an "18-patch". 


This is my basic block and they are all super scrappy. This quilt, like the one I made for us, will have 216 of these 18-piece blocks and will measure 96" x 113", plus a 4" border. It makes a pretty huge quilt, but that also means you can double it over on itself and have a two-layered quilt for especially cold nights.


These are the half-hexagons I have already basted. The ones like the yellow one on the left will be for going down the right and left sides of the quilt and the ones like the red one on the right will be sewn onto the top and bottom blocks. 

Once I have my "18-patches" done, I lay out the ones I want for the top and bottom as well as the right and left sides, then I attach a numbered label(i.e.: T1-meaning the top left-side block). That way I know which blocks go where and can attach the half-hexies. It would be way too cumbersome to have to attach these small pieces once the body of the quilt is all sewn together.

Question of the Day:

Have you ever made a quilt using the English Paper Piecing technique? If not, would you be interested in a tutorial on how to baste the fabric to the paper shapes, then sew the shapes(hexies) together?

Sharing is caring!!!

Don't forget that I am happy to share…feel free to pin to Pinterest, post on Google+ and Facebook, and Tweet away*! Just please make sure your posts link back to this blog. 

*If you mouse/hover over the top right corner of my photos, a red pin-it button will show up and all you have to do is click it to be taken to your Pinterest boards. There is also another red button right beside it for posting to Facebook and Twitter. Or, you could always use the little grey square buttons at the end of this post.

Thanks for reading and have a great day! 

Quilty Huggs, 

Jacqueline 

PLEASE NOTE: The writer of this blog accepts forms of compensation such as, but not limited to; fabric/notions/patterns/books in exchange for a posted review. All comments/critiques/opinions are completely my own and are not those of the provider. This post may also contain affiliate links and I will receive a small commission if you make a purchase after clicking on my link. Thanks!

Tuesday, March 10, 2015

Book Review and Giveaway WINNER!!!

Hi peeps! 


I thought I would share a book I received for Christmas, as I realized it has been ages since my last book review! This is Make+Love QUILTS, by Mary Fons. Does her last name sound familiar? Well it is, because her mom is Marianne Fons of the dynamic quilting duo Fons & Porter! Mary Fons is also the Editor of Quilty magasine, which has become a new favourite!


The book is very well-written with lots of colour photos, and is a Stash Books publication(a niche division of C & T Publishing)…I own several Stash quilting books and have never been disappointed by their quality and attention to detail. 

The first 39 pages are dedicated to Theory + Practice; fabric, design fundamental and construction basics, then you move on to the 12 quilt projects.


This is the quilt from the cover…and my main reason for putting this book on my Christmas List! Each quilt photo is paired with colour suggestions. This one is the biggest quilt in the book, as-is the measurements are 108" x 126", but it is easy enough to adjust your quilt to be smaller.

I should note that all of the quilts in this book are made with scraps, but you don't have to use only scraps, you could go with a more controlled palette.


As you already know, I am a big fan of COLOUR! Not so much a fan of low-volume, but what attracted me to this quilt is the use of right-angle triangles. I also have the Accuquilt right-angle triangle die, so I knew I would be able to cut the pieces for this quilt easily…and from my scraps of course!


I must confess that the Bow Tie block is a top ten favourite block(Churn Dash wins hands down!!). It would be fun to make this quilt using the pictured black background with a multitude of scraps for the bow ties.


You gotta love a quilt named "My Dear" right? Those simple Nine-Patches mixed with a row of Rolling Stones blocks really give this quilt a modern edge while still making the blocks accessible to any skill level.


What can I say??? Of course I chose this Churn Dash quilt as the final quilt to show you!!! So easy to do up in scraps or with a coordinating 4-fabric bundle plus border!

As I said above, there are 12 quilts in this book. I have only shown you my favourites.

In my last post I showed you the cover of my Moleskine block ideas/design book. I though that you might want to have a glimpse at what I do when I am sketching and designing! 

You can find a design book for yourself at Massdrop.


This is a block I have been working on re; the Charlie Hebdo massacre in Paris earlier this year. I also included the two towers of 911 in New York as I felt that both horrific incidents were connected by tragedy. 

I don't yet know if I will be doing a tutorial of this block…some bugs to work out!!!


This is not an original design. I was working on changing the measurements of the finished block and also of the first square and resulting logs.


Here you can see where the first idea got trashed and the second attempt is so much better. I prefer to work on unlined paper, even though I have to draw the lines myself. That way I can play with the dimensions a bit more.


One thing I forgot to mention about Connecting Threads are the cute little postcards they include with each order. They have the Customer Service phone number on them so you can easily reach them if there is a problem.

After many years of no-trouble purchases I had a minor issue with one this year and called the Customer Service Department. The person on the phone looked up my order and listened to my problem, then corrected it quickly and politely, just like that. No hassles whatsoever! Gold Star to them!!!


I was on the Connecting Threads website yesterday and I noticed that Make+Love QUILTS(reviewed above) was in their Clearance section, at $10.33, which is 55% off!!! Woo-hoo!!!

Also in the Clearance section is this week's Weekly Deals, which are website-only specials that usual offer great discounted prices. This week's deals are on marking tools and acrylic rulers!

Now for the giveaway winner!!!

Wow, there were several hundred comments(YAY!!!) and it was hard to choose, so I asked Mr. Random(aka my Hubs) to choose a number and he chose…

#154. sherryberrybim, who wrote:

sherryberrybimSaturday, March 7, 2015 at 6:28:00 PM PST
I would make a lap quilt with this bundle of Luminescence.
I have sent an email!

Thanks so very much to all of you who entered and made this giveaway a big success!! Thanks also to my many new/continuing(can't say 'old'…just didn't sound right) followers who choose to allow me to come to their mailboxes a few times a week! I will endeavour to keep you entertained!!

Sharing is caring!!!
Don't forget that I am happy to share…feel free to pin to Pinterest, post on Google+ and Facebook, and Tweet away! Just please make sure your posts link back to this blog. 

*If you mouse/hover over the top right corner of my photos, a red pin-it button will show up and all you have to do is click it to be taken to Pinterest. There is also another red button right beside it for posting to Facebook and Twitter. Or, you could always use the little grey square buttons just below my signature. 

Thanks for reading and have a great day! 

Quilty Huggs, 

Jacqueline 

PLEASE NOTE: This post may contain affiliate links and I will receive a small commission if you make a purchase after clicking on my link. Thanks!

Sunday, March 8, 2015

Sum it Up Sunday & Giveaway Reminder!

Hi peeps! 


How are you doing on this fine Sunday? I say fine as it has been warm and sunny here since Friday…I even went out and about in a t-shirt today! Yay!!!

Just wanted to remind everyone that today is the last day to enter my giveaway: A 27-piece fat quarter bundle(some prints shown above) of LUMINESCENCE from the lovely folks at Connecting Threads. Have you had a chance to check them out yet?

Here's the link to the giveaway post:

***GIVEAWAY IS CLOSED AND THE PRIZE HAS BEEN AWARDED***

All you have to do is comment with your answer to the question stated there. You may also have a second entry if you follow me…and tell me how you do! There are follow windows for email and Bloglovin' on my right sidebar. 

Note: if you choose to Follow by Email, Feedburner will send you an email with a link to click. This is not spam. Feedburner needs your permission to send my posts to you. If you don't click that link, then my posts won't be delivered to your inbox. 
Just so you know!


I was at a church jumble sale recently and spotted this quilt. It is a bit rustic, but the colours go well in my living room and I couldn't beat the price…a whopping $2.50!! It is about 50" x 50" and is hand-appliqueed and hand quilted…both skills I can no longer do, due to carpal tunnel surgery on both wrists. 

They were raising money for a clean water well in Mexico, so I was more than happy to support them with a few other purchases too!!!


Yes, this photo is supposed to be blurry and obstructive! I can't actually show you yet as I am working on a block for a Sew-a-Long here on my blog coming very soon!!! 

That leather-bound book above is made by Moleskine and is my go-to block-ideas/designing book. It was the Hubs' Christmas present from his firm, but as soon as I saw it, I had to have it!!! It has a pocket inside the back cover for loose papers, a ribbon book mark and an elastic closure…perfect for taking with me from easy chair to sewing table. I just love it so much…and will have to get another soon, as this one is almost filled up. Thankfully, I can usually find them on Massdrop!

Sharing is caring!!! Don't forget that I am happy to share…feel free to pin to Pinterest, post on Google+ and Facebook, and Tweet away! Just please make sure your posts link back to this blog. If you are not sure, please ask me!

If you mouse/hover over the top right corner of my photos, a red pin-it button will show up, and there is another button right beside it for posting to Facebook and Twitter. Or, you could use the little grey buttons just below my signature.

Thanks for reading and have a great day! 

Quilty Huggs, 

Jacqueline 

Thursday, March 5, 2015

Giveaway, Giveaway, Giveaway!(…and a recipe too!!!)

Hi peeps! 


I'd like to extend a warm welcome my new sponsor, Connecting Threads.

Connecting Threads has graciously offered this 27-piece fat quarter bundle of their brand-new Luminescence fabric line as a giveaway to one of you!!! 

…and it's primarily purple…mmm! Wish I could enter this giveaway myself!


Here's a little bit about them:

Connecting Threads offers quality cotton fabric, designed specifically for quilters. Connecting Threads is an online and catalog retailer selling quilting fabrics from some of the industry’s most popular manufacturers like RJR Fabrics, Cotton + Steel, and more. Connecting Threads also sells our own exclusive fabrics, with limited-edition designs that you won’t see anywhere else. Each of our exclusive fabrics are created according to our exacting standards and finished with our top-secret formula to create a flawless and amazingly soft finish.
We are proud to offer our exclusive fabrics at a price that fits within most budgets without sacrificing quality one iota. How do we manage this? We go directly to the mill, taking the middleman out of the equation. By sourcing and selling our fabrics directly, we are able to offer our customers wholesale prices on fabrics that won’t be found anywhere else. We believe that convenience shouldn’t cost extra, so we never charge for cutting. This means that our charms, strips and other precut fabric bundles have the same per-yard cost as our normal yardage cuts. Because affordability is one of the core values at Connecting Threads, we also do our best to offer fabrics from outside manufacturers at the lowest prices possible.

I love, love that their in-house lines retail at $5.96(US$) a yard…and they have Cotton & Steele basics at only $9.96 a yard! They also have an amazing Clearance section with deep discounts on Fabric, Books, Tools and Patterns…so many deals to be had! 


Connecting Threads often has excellent sales with up to 40% off regular retail prices. For example, right now they are offering 30% off their EssentialPro polyester thread and 40% off specialty rulers and pressing tools! WOW!!!

They offer free shipping within the continental US with any order over $50. Shipping to Canada is only $7.99 with your $60+(US$) order. They also collect any duty and taxes owing so that we Canucks don't have to pay Canada Posts's onerous $5 "collection fee"..a personal pet peeve.

I have been shopping at Connecting Threads for YEARS, since before they had their beautiful website! As a matter of fact, I always have an open shopping cart and wish list to dream about!

To find out how to enter the giveaway…read on, McDuff!!!

Photo: Vancouver Sun website

Do you remember when I mentioned making vegetable stock(or broth) in this post? Well, there was a feature article and recipe in yesterday's Vancouver Sun about just that. They said there are studies where it's been shown that homemade broth has extremely good restorative properties and can help mitigate many medical conditions. Sports doctors regularly recommend drinking broth to help heal injuries faster and cut the length of the common cold and flu.

The young guys above have a shop which specializes in making/selling their homemade stock which they simmer for 4-5 days!!!

Photo: Vancouver Sun website
There are even "broth bars" popping up around Vancouver where you can buy a steaming cup of homemade broth to enjoy…watch out Starbucks!!!


I decided to give the Hubs a break from cooking and made a big pot of chili con carne yesterday. I can't give you a cost-per-meal on this one as I had everything in my pantry. I do know that the cans of beans were $0.99 each, the paste was $0.75, and the tomatoes were around $1.25…just can't remember what I paid for the juice. The lean hamburger meat was also on sale and I had the spices in-house.

When specific canned goods(like the ones above) go on sale, I grab the limit allowed to stock my pantry.

My 'secret ingredient' is Clammato juice, but we didn't have any and I wasn't going to head to the grocery store for one thing that was probably not on sale. So, I subbed in the V-Plus juice.


I browned 2 pounds of lean hamburger meat then placed the cooked meat on a paper-towel-lined plate to absorb the excess grease. Then I caramelized 2 medium, chopped onions in the same pan. While I was sautéing the onions I was dumping the contents of the canned goods into my large pot…making sure to rinse the goo off the beans in a colander beforehand. I added generous portions of cumin, chili powder, dry mustard and black pepper as well as 5 cloves of well-chopped garlic. I forgot to add red pepper flakes!!!

Then I added the drained meat and cooked onions into the large pot and heated to a rolling boil, stirring constantly. I love how the above photo shows the steam rising!!! Then the hard part…turn the burner down to medium and keep stirring for at least a half an hour. Then I just leave it to cool on the stove.

About a half an hour before suppertime, I crank up the heat to rolling boil again and continue stirring for about 30 minutes…this allows the chili to thicken and the flavour also intensifies.


The end result…a steaming bowl of chili to knock away the winter chill! There is enough in the pot for 3 suppers for 3 people.


Now, for the giveaway!!!

-Leave me a comment telling me what you would make with this lovely 27-piece bundle of Luminescence!

-For a second entry, follow this blog and indicate how you follow(i.e.: by email or via Bloglovin'). The Follow windows are on the upper right sidebar of this blog. 

Please note: with the follow by email option, they(Feedburner) will send you a confirmation email…you have to click the link they give you in that message to become an actual follower who receives my blog posts in their inbox.

*Two entries per person please.*

*For Canadian and USA residents only.*

*Giveaway closes at NOON, MONDAY MARCH 9, 2015

Connecting Threads and Jacqueline Frances are not responsible for lost or stolen mail.

Feel Free to share with your friends, post to Facebook, pin to Pinterest and Tweet away!!! There are little grey sharing buttons in the box at the end of this post.

***GIVEAWAY IS CLOSED AND THE PRIZE HAS BEEN AWARDED***

Thanks for reading and have a great day! 

Quilty Huggs, 

Jacqueline 


Tuesday, March 3, 2015

A Charming Smile, Tuesday Tip and a Contest to Enter!

Hi peeps! 


How is everybody today? I am at the tail-end of a four(yes, four) day migraine…not fun at all! The sun is shining, it is fairly mild and I'm talking to you…so a much better day! 

Before I was laid low I managed to get my citrus batik HSTs for the table topper all trimmed…YAY!!! Now I get to have fun and play!! I'll get you up to date on that!!!


Did you know…Much like velvet and corduroy, thread has a nap?...I KNOW!!!
I only found this out recently…this is after almost 40 years of plying a needle…

When you hold the end of the thread that is coming directly off the spool and press your fingers while running them down the thread, it will feel smooth. Now do the reverse…you can actually feel the difference.


This is an important thing to consider, especially if you do a lot of hand sewing. So, what I do is thread my needle BEFORE I have clipped my length of thread. That way I will remember which tail of thread is which. I keep that end of the thread short and cut at the end of the longer piece. The longer piece will always be on the nap...and the shorter piece will be against the nap…but that is okay as it's the longer piece that I'm concerned with.


Once I am sure which thread-end is which, I knot the longer end. It really makes a difference! I do a lot of hand sewing at night in front of the TV(will show you in a later post) and can tell you that my thread runs through the fabric pieces smoothly and I rarely get a tangle! Awesomeness!!!


Last night I managed to get another men's shirt cut up…I really have to start removing the buttons from the placket strips…I've got several of them waiting for attention! As you can see, this one has an embroidered logo and I will try to find a use for that. The shoulder yoke and sleeve cuffs were lined in a nice chambray, which was an added bonus. 

This was one of the Kid's shirts, a men's size small, so there wasn't as much useable fabric. But, I had originally purchased it at half price from Value Village, it was worn for a year and now I have cut it up for quilting fabric…so it was a super-recycling project, and plus I really liked the pattern/colours. I might give it a bit of a starch treatment as the resulting fabric is a tad thinner than the other shirts I have slated for demolition.


Don't forget to enter Craftsy's #Secret Stash Contest! Prized include a secret stash box of goodies as well as a Craftsy class of your choice! Bonus!!!

Stay tuned as I have new sponsor news AND another giveaway coming soon!

Thanks for reading and have a great day! 

Quilty Huggs, 

Jacqueline

Wednesday, February 25, 2015

W.I.P.-it, W.I.P.-it good Wednesday!

Hi peeps!


I started working on the citrus batik table topper I mentioned here and here.


I usually eyeball it when I'm doing half square triangles(and they never seem to work out), but this time I decided to draw the sewing lines on the wrong sides with my Frixion pen. Woa! What a difference that makes! I never realized how much my machine(and my hands) move the fabric around, making slightly wobbly lines instead of nice straight lines. 

In all fairness Pfrancine(my Pffaf) is in dire need to be cleaned and have the motor timer reset but I got this pretty pile done in no time flat!


I wanted to show you what happens when put your iron on the marks made with a Frixion pen. You can see the pen marks on the bottom triangle, below the stitching. 

I pressed the seam quickly, and as you can see on the top triangle, the marks disappeared completely. It's like magic!


I have been seeing others around blog-land who are pressing their seams open and thought I would give it a try. A small project is a great place to see how it goes. I liked how crisp the seam was.


Here is one of the finished HSTs, now all I have to do is *ug* trim these squares down. 

I can't tell you the specific dimensions as this was a free-with-purchase pattern and it is not available on the Timeless Treasure website. I did go there to check, so that I could share with you, but no I can't. Sorry…but, you can probably figure it out!


I wanted to talk about thimbles…do you use them??? 

I have never been able to use a conventional thimble, they always felt 'wrong' on my finger. I have been using a leather thimble(pictured above) for years, but wear them out very quickly as I push the needle with the side of my middle finger. These thimbles cost around $10-$15 plus shipping and I have gone through several in the past 18 months, while I have been working on two enormous hexagon projects.

I saw the blue one(a Roxanne's mid-priced metal thimble) on clearance so I ordered the largest size. I have mentioned my thick fingers before, and I really thought the XL size would fit. Well, it only fits if I rub a tiny dab of hand lotion into that finger…and, well it still didn't feel all that right. Plus after just a few hours of use, the pretty blue paint started to come off!


I was shopping at a favorite Etsy shop and noticed the metal cuff-style thimbles there. They were ultra cheap…I think 4 for $1, so I bought them. Well, they work great! I have been using one for a couple of months now, with no problem! Just goes to show you that expensive doesn't always mean the best!


Don't forget to enter Craftsy's #SecretStash Contest here.
Prizes include a box of secret stash goodies(and they have tonnes of things to choose from!!!) as well as a Craftsy class of your choice! Cool!!!

Also, the person I awarded my consolation prize to in my last giveaway never got back to me, even though I allowed 48 hours for a response. 

I have contacted Pam P. and hope she will get back to me asap!

I did notice that a lot of the people that commented were "no-reply bloggers" which means they didn't have an email connected to their open id and therefore I had no way of contacting them. So, if you would like to win …and receive your winnings, please check your Google+ account and see if your email is visible in the top right drop-down window. If it isn't, just Google how to fix the no-reply blogger issue on your Google+ account and you will find a few tutorials to show you how to fix it!

By the way, a big HELLO *waving happily* to my new followers. Thanks so much for joining up!

Question of the day:

Do you wear a thimble, and if you do, what kind of thimble do you use?

Thanks for reading and have a great day!

Quilty Huggs,

Jacqueline